How to Tie a Reef Knot Step by Step
_Knot")
One of the oldest and most used knots in the world is the so-called reef knot, also known as a square knot and even as a Hercules knot. It is quite simple to make and one of the most useful knots no matter if you'll be camping, fishing or sailing because it is one of the most basic knots to join two ropes together, while it is also good if you want to join two ends of one rope. What makes it easy to make is its resemblance to knots we use to tie our shoelaces together, especially in the first few steps.
In this guide, we'll go through the instructions on how to tie a square knot, but also you'll see when you could and should use it when it is better to avoid it, and other interesting and useful information about this almost ancient knot.
Reef Knot Tying Methods
Tying a reef knot can be done using one of the two above described methods, while you could also combine it with some additional add-ons to make it stronger and more secure.
First Method
Take two different ropes or two ends of the same rope in both of your hands. Start by laying the rope from your right hand over the rope that's in your left hand.
You could do it a different way, by laying the left over the right rope, but you'll have to switch directions of all the steps that follow.
Wrap the rope from your right hand under the one from your left hand. This should make the right-hand rope pointing out to the left side.
Guide the right rope back until it is over the left-hand rope. This should result in a so-called "half a knot", and by repeating these three steps, you'll end up with an overhand knot, but that's not what we're looking for here.
Take two ends of these knots and join them, so they form a loop, but don't tie them. By now, the end of your right rope should be pointing left and vice versa.
Move the right-hand rope's end under the left-hand rope's end. This is essentially a repeated second step but in different directions.
Pull both ends as strong as you can to make your knot tight, but be careful while you do it. The key is to use equal force on all four-knot ends or else you'll risk it losing its shape, while it could also untie. A good way to achieve this is to grab all four ends – two with your left and two with your right hand and pull them equally.
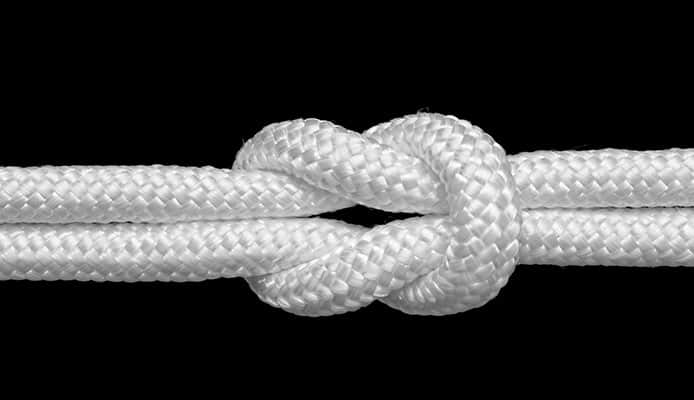
Now your reef knot is tied, it is time to check it. This shouldn't be a problem, as all you have to do is to find a photo of a reef knot and compare it. Because of its elegance and neat looks, if you see something uneven or looking weird, you've probably done something wrong, so start over. What you want is an even knot with one loop wrapped around the base of the second one.
Now when you know how to tie it, it is time to learn how to untie a square knot. Take both loops in your hands, and pull them in the opposite directions. This should untie your knot easy and clean.
Second Method
The difference between the first and the second method is in the way it is made, but the final result will be completely the same.
Again, as you've done with the first method, take the rope ends in both of your hands. Fold the left-hand rope so you create a loop (or the right one, but you'll have to reverse the rest of the method).
Use the end of the rope that's in your right hand and pull it through the formed loop. Take your index finger and lock it around the loo's base to make things easier and more comfortable. If you don't do it, the loop may unfold, so you'll have to start over.
Follow by moving the right-hand rope over the base part of the left-hand rope loop. This should place the right-hand rope back on the top.
When the right rope passes the left rope's loop bottom (the area where the loop starts), it should be at the top, above the loop, facing right. From there, just pull it again through the loop, and then take the right rope's end and pull it firmly. Again, pay special attention to the way you're making it tighter. The force you use should be equal or it may become untied, uneven, etc.
If you want to untie it, simply take the loops and pull them in the opposite directions.
Additional Methods
You could combine those two methods with some other ways to gain specific advantages.
Added Strength
One of the things you could do to provide additional strength is to add another half knot. When you're done making a square knot and all you have to do is to pull those ends tight to secure them, you could do the "over-and-under" sequence again to create an additional half-knot at the top of your square knot. You can repeat this as much as you feel you need to. This way you'll get a bit more strength out of your knot. Not much, but it will do for some basic stuff.
Extra Coil For Surgeon's Knot
Another way you can make your square knot stronger is to combine it with a surgeon's knot. At the very beginning of your knot-making procedure, just after you wrap the right rope under the left rope for the first time, do it again so you create a second coil. Do the rest of the knot normally, without adding the second coil on the second part of the knot, if you don't want to.
Loops Instead Of Single Ropes
For this, you'll need longer ropes because you'll be using loops instead of single ropes. You'll start with two loops from both rope ends, and then use those loops the way you'd be using single ropes to create a reef knot.
Practice
Repetition is the mother of learning, says one Latin proverb. To properly learn how to make a square knot, take two ropes of different colors and try it out until you succeed. Once you do, repeat at least a few times. If you use two ends of a single rope, you could mark those ends with a different color tape. This way you'll learn easier, and once you do you'll know how to make a reef knot day or night.
When Not To Use Square Knot – Downside
Clifford Warren Ashley, the legendary knot expert and the author of "The Ashley Book of Knots", has stated that poorly made square knots are responsible for more deaths than all the other known knots combined. The reason is the fact that they are easy to undo. So, if you have to secure anything, tie something heavy, or use a knot in the case of an emergency, it is better to avoid this type of knot. Check our guide on other knots instead.
Even if you add additional steps with some of the alternate methods described above, the square knot will not be safe and strong enough to be completely reliable in critical conditions. It is extremely unstable when jiggled and when underweight, so it is better not to risk anything and skip the square knot if you need stability and security. Especially if you get caught by the rain and the rope becomes wet and slippery.
When To Use Square Knot
Now when you know how to make a square knot and when not to use it, here is the list of activities where a square knot can be your best friend because of its elegance and simplicity.
Camping
If you have to connect two ropes or lines or to use it for something that is not heavy, the square knot is an excellent option. This becomes especially useful in camping because there is always a need to tie something up.
Hiking
No matter how experienced you are and how strictly you check the weather forecast, the rain will eventually catch you outside if you spend enough time hiking, so things may become muddy. Using a square knot on your shoelaces will help to keep your boots on your legs and prevent mud from pulling them off. As you can see, this makes it great for basically any field and water-related activity – from hiking to fishing, and even kayaking. Also, check our guide on how to lace your hiking boots.
First Aid And Medical Purposes
A properly tied square knot will lie flat, so it is the perfect option if you have to tie a bandage. It is also one of the knots surgeons use often, and many sutures are finished up with reef knot.
Hair Braids
Long hair can be quite annoying during hot, summer days, but braids made with a square knot will most definitely help.
Bandanas
Tying a bandana during hot, summer days can be extremely comfortable and protect your head, and one of the most stable and easiest knots to do is a reef knot. It is also really popular because you'll be able to do it right on your head and by yourself.
Fishing
The reef knot is also one of the most popular and basic fishing knots used to tie two pieces of fishing line together. Because it is so smooth and flat when tied properly, it won't tangle your lines. The downside is the fact that it is not as good of a choice if you plan to fish in the sea or ocean as it won't help if you encounter some bigger fish. Also, check out our guide on how to tie other fishing knots.
Magic Tricks
A good magician doesn't discover his tricks, but if you're into magic, it may be fun to know that the reef knot is one of the main knots in the world of trickery. If you learn how to use it, you'll be looking into many hours of fun near the campfire (if one is allowed and safe, of course).
Rope Joining
Over time your rope can break, or you could end up with many different rope parts. Instead of throwing them out, use a square knot to tie them together and make their life longer. This makes it perfect for budget camping.
Globo Surf Overview
Officially, square or reef knot has been around since the 1700s, when it was used by sailors. Because it is easy to learn and it looks nice, it has found its purpose in everyday life among pioneers, scouts, camping, fishing, kayaking, and basically any possible activity. Although, its simplicity also means it is one of the less reliable knots, so make sure you use it only for light and easy things.
More Sail Reviews:
- Sailing Hat
- Sailing Sunglasses
- Sailboat Winches
- Solar Panels For Sailboats
- Sailing Boots
- Clove Hitch
- Boating Safety
- Laser Sailing Fitness
- How To Soften Leather Shoes
- How To Sail
Source
- The reef knot, nudos.org
How to Tie a Reef Knot Step by Step
Source: https://www.globosurfer.com/how-to-tie-a-reef-knot/