How to Stop Auto Update in Windows 10 Laptop
On Windows 10, quality updates (or cumulative updates) download and install automatically as soon as they become available. Although this automatic approach allows devices to receive security updates to patch vulnerabilities, improve performance, and bring enhancements without user interaction, it is perhaps one of the most controversial features.
Typically, it's because updates contain bugs that can negatively affect the experience in many different ways. For example, they could break existing features, introduce driver and application compatibility problems, Blue Screen of Death (BSoD), and they require a restart to complete the installation that can disrupt the user workflow.
If you tend to see more problems than benefits during updates, or you have a good reason to use a computer unpatched, depending on your edition of Windows 10, you can disable automatic updates using the Settings app or permanently with the Group Policy or Registry.
In this Windows 10 guide, we will walk you through the steps to prevent Windows Update from downloading and installing updates on your computer automatically.
- How to disable automatic updates using Settings
- How to disable automatic updates using Group Policy
- How to disable automatic updates using Registry
How to disable automatic updates with Settings
If you want to skip a specific update, you do not need to disable Windows Update permanently. Instead, you should pause updates until the next Patch Tuesday arrives. The Settings app includes an option to stop system updates for up to 35 days on Windows 10 Home and Pro.
To disable automatic updates temporarily, use these steps:
- Open Settings.
- Click on Update & Security.
- Click on Windows Update.
-
Click the Advanced options button.
 Source: Windows Central
 -
Under the "Pause updates" section, use the drop-down menu and select how long to disable updates.
 Source: Windows Central


Once you complete the steps, updates will no longer download until the day you specified. When the computer reaches the pause limit, you will need to install the latest patch available to make the option available again.
You can always undo the changes with the exact instructions outlined above, but on step No. 5, choose the Select date option. Alternatively, you can accomplish the same effect by clicking the Resume updates button on the Windows Update page.
How to disable automatic updates with Group Policy
The Local Group Policy Editor available on Windows 10 Pro includes policies to permanently disable automatic updates or change the Windows Update settings to decide when patches should be installed on the computer.
Disable updates
To disable automatic updates on Windows 10 permanently, use these steps:
- Open Start.
- Search for gpedit.msc and click the top result to launch the Local Group Policy Editor.
-
Navigate to the following path:
Computer Configuration > Administrative Templates > Windows Components > Windows Update -
Double-click the Configure Automatic Updates policy on the right side.
 Source: Windows Central
 -
Check the Disabled option to turn off automatic updates permanently on Windows 10.
 Source: Windows Central
 - Click the Apply button.
- Click the OK button.


After you complete the steps, the system will stop downloading updates automatically. However, the ability to check for updates manually will continue to be available on Settings > Update & Security > Windows Update, and clicking the Check for updates button to download the most recent patches.
If you want to enable automatic updates on the device again, you can use the exact instructions outlined above, but on step No. 5, make sure to select the Not Configured option.
Limit updates
Alternatively, the Local Group Policy Editor lets you device how to disable automatic updates.
To manage Windows Update automatic downloads with Group Policy, use these steps:
- Open Start.
- Search for gpedit.msc and select the top result to launch the experience.
-
Navigate to the following path:
Computer Configuration > Administrative Templates > Windows Components > Windows Update -
Double-click the Configure Automatic Updates policy on the right side.
Source: Windows Central - Check the Enable option to turn on the policy.
-
Under the "Options" section, select the option to prevent updates from downloading and installing automatically on Windows 10:
- 2 - Notify for download and auto install.
- 3 - Auto download and notify for install.
- 4 - Auto download and schedule the install.
- 5 - Allow local admin to choose setting.
- 7 - Auto Download, Notify to install, Notify to Restart.
Quick tip: The best option to disable automatic updates is the 2 - Notify for download and auto install option, but you can make a different selection. If you choose option number 2, updates won't download automatically. Instead, in the Windows Update settings page, you will now see an "Install now" button to manually trigger an update.
 Source: Windows Central
 - Click the Apply button.
- Click the OK button.

Once you complete the steps, automatic updates will be permanently disabled on Windows 10. However, when new updates become available, you will be able to install them manually from the Windows Update settings page.
How to disable automatic updates with Registry
You can also disable automatic updates using the Registry in at least two different ways, like when using the Local Group Policy Editor.
Warning: This is a friendly reminder that editing the Registry is risky and can cause irreversible damage to your installation if you don't do it correctly. It's recommended to make a full backup of your PC before proceeding.
Disable updates
To disable Windows 10 updates permanently modifying the Registry, use these steps:
- Open Start.
- Search for regedit and click the top result to launch the Registry Editor.
-
Navigate to the following path:
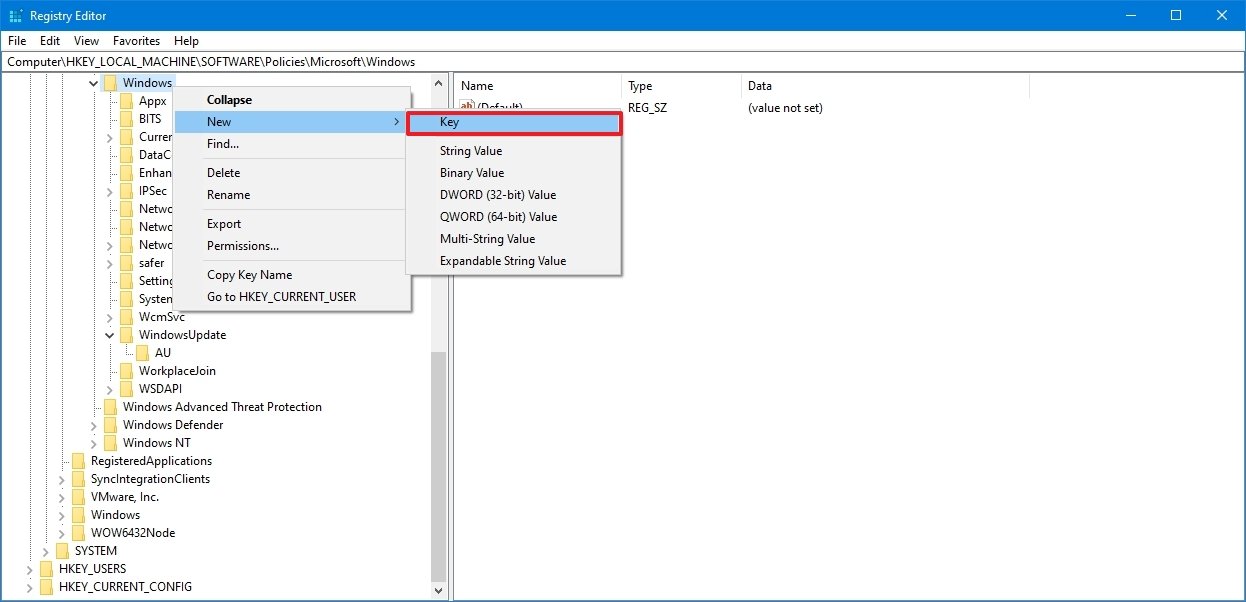
HKEY_LOCAL_MACHINE\SOFTWARE\Policies\Microsoft\Windows -
Right-click the Windows (folder) key, select the New submenu, and then choose the Key option.
 Source: Windows Central
 - Name the new key WindowsUpdate and press Enter.
-
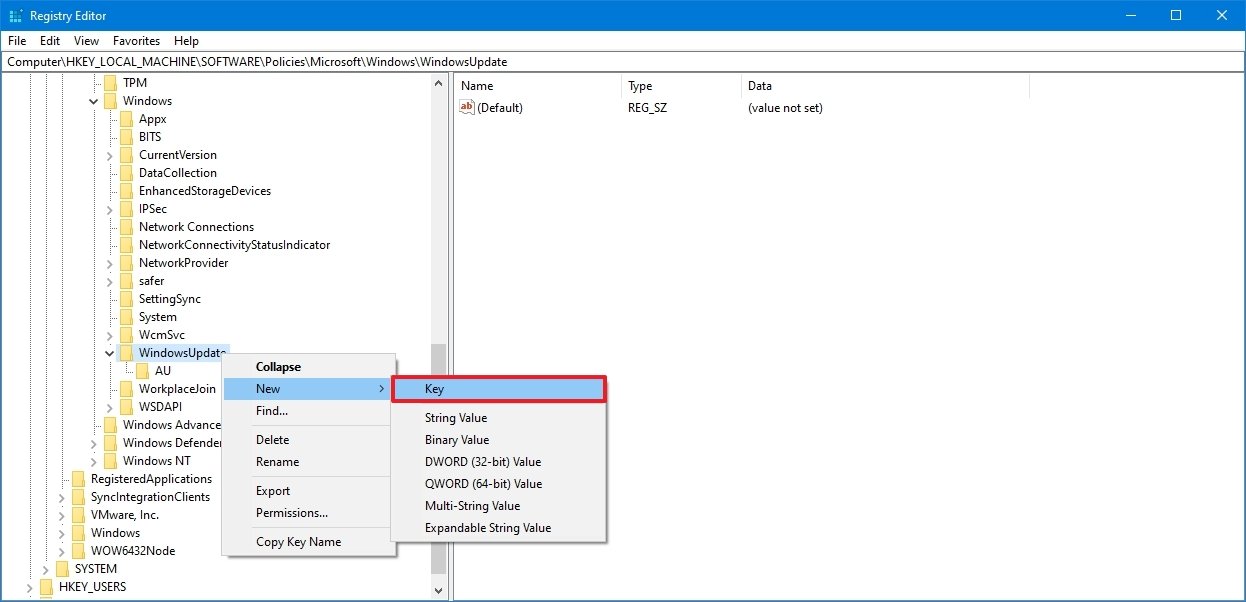
Right-click the newly created key, select the New submenu, and choose the Key option.
 Source: Windows Central
 - Name the new key AU and press Enter.
-
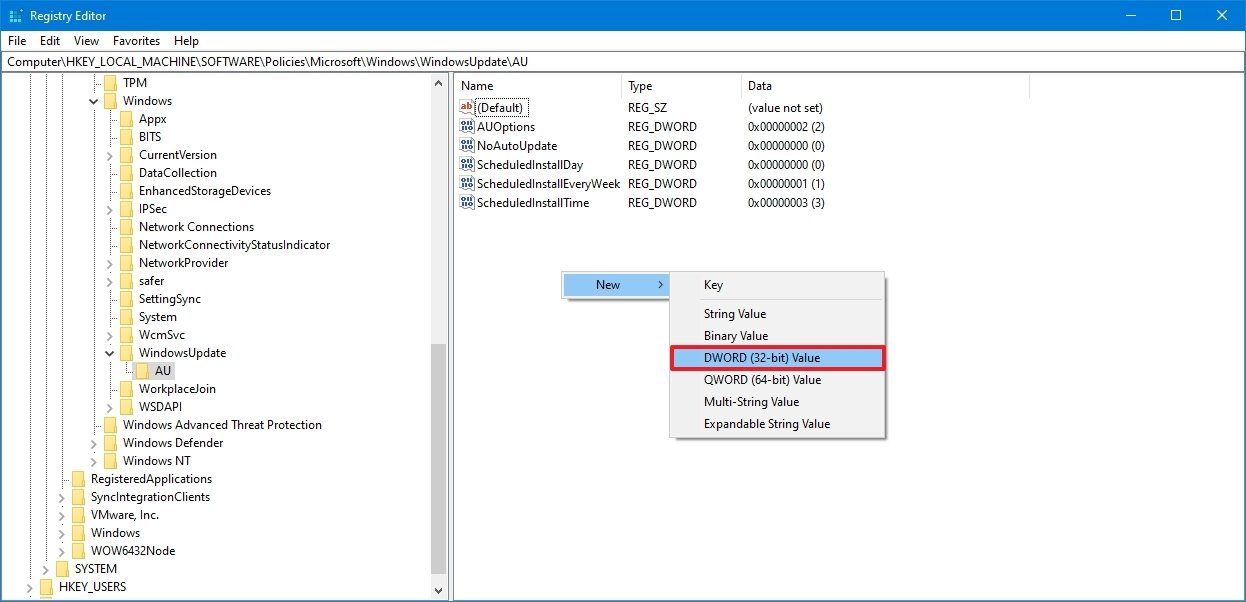
Right-click the AU key, select the New submenu, and choose the DWORD (32-bit) Value option.
 Source: Windows Central
 - Name the new key NoAutoUpdate and press Enter.
-
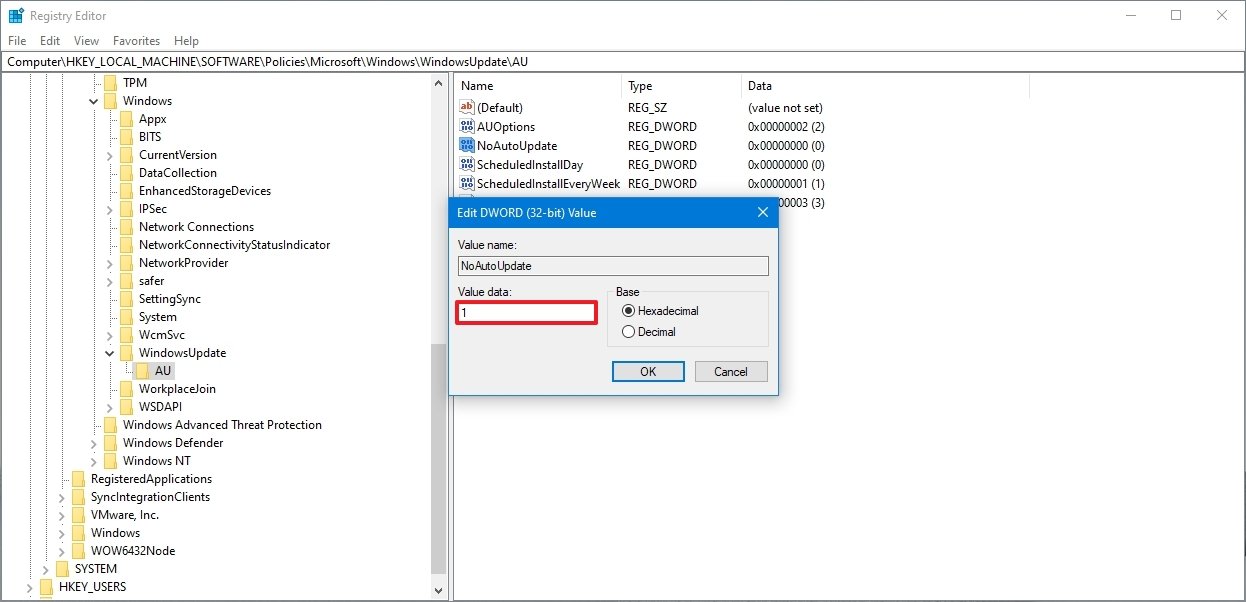
Double-click the newly created key and change its value from 0 to 1.
 Source: Windows Central
 - Click the OK button.
- Restart your computer.


After you complete the steps, Windows Update automatic updates will be disabled permanently. However, you will still be able to download updates as needed by clicking the Check for updates button on the Windows 10 update settings page.
If you want to undo the changes, you can use the same instructions outlined above, but on step No.4, right-click the WindowsUpdate key, select the Delete option, then reboot the computer to apply the settings.
Limit updates
You can also use the Registry to configure the system settings to decide how Windows 10 receives updates.
To customize Windows Update settings to block updates with the Registry, use these steps:
- Open Start.
- Search for regedit and click the top result to open the Registry Editor.
-
Navigate to the following path:
HKEY_LOCAL_MACHINE\SOFTWARE\Policies\Microsoft\Windows -
Right-click the Windows (folder) key, select the New submenu, and choose the Key option.
Source: Windows Central - Name the new key WindowsUpdate and press Enter.
-
Right-click the newly created key, select the New submenu, and choose the Key option.
Source: Windows Central - Name the new key AU and press Enter.
-
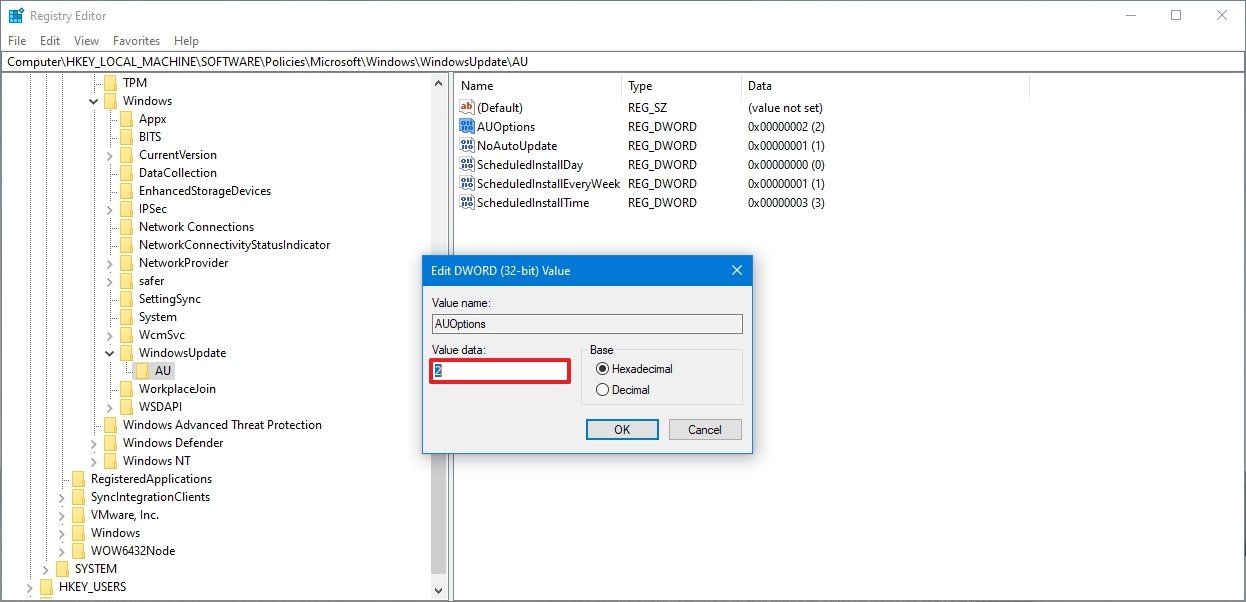
Right-click the AU key, select the New submenu, and select the DWORD (32-bit) Value option.
 Source: Windows Central
 - Name the new key AUOptions and press Enter.
-
Double-click the newly created key and change the value (number only) to:
- 2 — Notify for download and auto install.
- 3 — Auto download and notify for install.
- 4 — Auto download and schedule the install.
- 5 — Allow local admin to choose settings.
- 7 — Auto Download, Notify to install, Notify to Restart.
These options work exactly like the Group Policy settings, and option number 2 is the closest to disable Windows Update on Windows 10 permanently.
 Source: Windows Central
 - Click the OK button.
- Restart your computer.


Once you complete the steps, cumulative updates will no longer download and install automatically. However, when a new update becomes available, you will find the option to install it manually from the Windows Update settings.
You can always use the same instructions to restore the original settings, but on step No. 4, right-click the WindowsUpdate key, select the Delete option and restart the device.
Whether you use Windows 10 or another OS, updates are essential to fix security vulnerabilities, address problems, and improve the overall experience. However, sometimes, there are good excuses to disable them. For example, when you want to have complete control over system updates. You want to minimize the chances of running into issues due to buggy release. Or you are using a critical application or equipment, and you do not want to come across any compatibility issues.
More Windows 10 resources
For more helpful articles, coverage, and answers to common questions about Windows 10, visit the following resources:
- Windows 10 on Windows Central – All you need to know
- Windows 10 help, tips, and tricks
- Windows 10 forums on Windows Central
How to Stop Auto Update in Windows 10 Laptop
Source: https://www.windowscentral.com/how-stop-updates-installing-automatically-windows-10